Sidebar
firstexample:first_example_microzed_sysdev
This is an old revision of the document!
System Developer
This is the method to choose when working on new low-level drivers, kernel improvements or new FPGA configurations.
In such cases you have to control the board in by your host development system right upon a POR (power-on reset). In this mode you have full control over every every part of the hardware. However, it will take time to set everything up after booting. Notably, the FPGA configuration has to loaded through JTAG each time you load a new program.
Step by Step Instructions
- Set the jumpers on your MicroZed board as follows
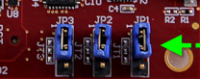 .
.
This will boot the device from JTAG. - Cycle the power. The settings of the jumpers will be read only at power-on! Hence, make sure to cycle the supply power after changing the jumper settings. A soft reset (through the JTAG or by pressing the reset button on the board will reset the board but will not sample the boot mode pins connected to the jumpers.
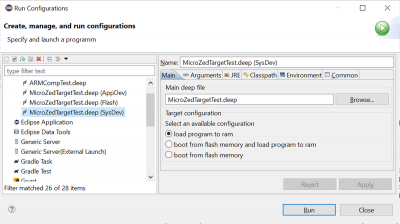
- Create a deep project and setup the project configuration as given in Hello World on the Avnet MicroZed Board. Also make sure to have OpenOCD started, see Starting OpenOCD
- If you need a valid configuration in your FPGA part (e.g. you are using flink devices), you must select a configuration file for the PL.

Available configurations can be found under https://wiki.bu.ost.ch/infoportal/embedded_systems/zynq7000/microzed. - When creating the run configuration, set the target configuration to load program to ram
 .
.


How Does the System Boot?
- reset (by JTAG)
- configuration of PLL, clocks, DDR by host system
- download of bin-files to OCM and DDR
- download of bit-file (if specified)
- start at address 0x100
firstexample/first_example_microzed_sysdev.1607545465.txt.gz · Last modified: 2020/12/09 21:24 by ursgraf
Page Tools
Except where otherwise noted, content on this wiki is licensed under the following license: CC Attribution-Share Alike 4.0 International
