Sidebar
firstexample:first_example_microzed_deploy
This is an old revision of the document!
Deploying
As soon as you are done with your development, you can deploy it. This means to load it together with a FPGA configuration onto a SD card. Alternatively, you can program it into the on-board QSPI flash device. We strongly recommend using the SD card and reserve the QSPI flash for using together with the Application Development.
The application together with the configuration of the FPGA is loaded upon power-up from the SD card or the flash device. What must be done using this method?
Step by Step Instructions
- Create a deep project and setup the project configuration as given in Hello World on the Avnet MicroZed Board.
- Choose a configuration for the FPGA part to be included into the resulting image.
 .
.
Available configurations can be found under Configuration Files. - When creating the run configuration, set the target configuration to boot from flash memory
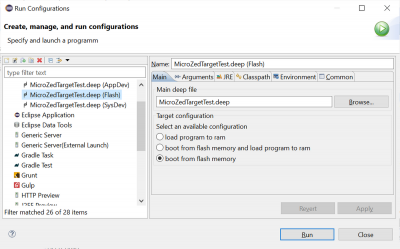 .
. - Running the configuration will create two flash files. Its location is given by the image file setting in the configuration. They carry the names *.ExternalFlash.mcs and BOOT.bin. Running the configuration will try to open a connection to the target if a programmer is chosen, such as OpenOCD. Make sure to remove the programmer, if you have no programmer present.
- Now, you have to choose between using a SD card or the QSPI flash.


Using the SD Card
Using the QSPI Flash
- Switch the driver for your JTAG-HS3 adapter to FTDI CDM, see https://wiki.bu.ost.ch/infoportal/embedded_systems/jtaghs3/start. IMPORTANT: You must close OpenOCD before switching the driver, else the WinUSB cannot be unloaded.
- The program to download can be found in the binaries of Vivado or the Xilinx SDK. You have to either install Vivado or Xilinx SDK which doesn't require a license. As Vivado uses lots of disk space we strongly recommend to install Xilinx SDK. For the installation see Installing Xilinx SDK. After installation, open a command shell and run the command (Change the command so that the right configuration file is loaded, see https://wiki.bu.ost.ch/infoportal/embedded_systems/zynq7000/microzed). The corresponding files can be found in your target runtime library in the directory /rsc. Please make sure that the paths in the following command does not include spaces!
cmd /C C:\Xilinx\SDK\2019.1\bin\program_flash -f MyProject\App.ExternalFlash.mcs -offset 0 -flash_type qspi-x4-single -fsbl M:\EUser\JCC\org.deepjava.trglib\rsc\FSBL.elf -cable type xilinx_tcf url TCP:127.0.0.1:3121
Make sure that the programming was successful with the program printing
Flash Operation Successful
- Switch the driver for the JTAG-HS3 back to WinUSB, see https://wiki.bu.ost.ch/infoportal/embedded_systems/jtaghs3/start.
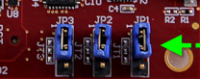
- Set the jumpers on your MicroZed board as follows
 .
.
This will boot the device from the JTAG. - Cycle the power. The settings of the jumpers will be read only at power-on! Hence, make sure to cycle the supply power after changing the jumper settings. A soft reset (through the JTAG or by pressing the reset button on the board will reset the board but will not sample the boot mode pins connected to the jumpers.

How Does the System Boot?
- reset (by power-on or reset button)
- load and run first stage boot loader from flash
- configuration of PLL, clocks, DDR
- load PL
- copy application to DDR memory
- handoff to address 0x100000
firstexample/first_example_microzed_deploy.1640702053.txt.gz · Last modified: 2021/12/28 15:34 by ursgraf
Page Tools
Except where otherwise noted, content on this wiki is licensed under the following license: CC Attribution-Share Alike 4.0 International
